
 Pin it
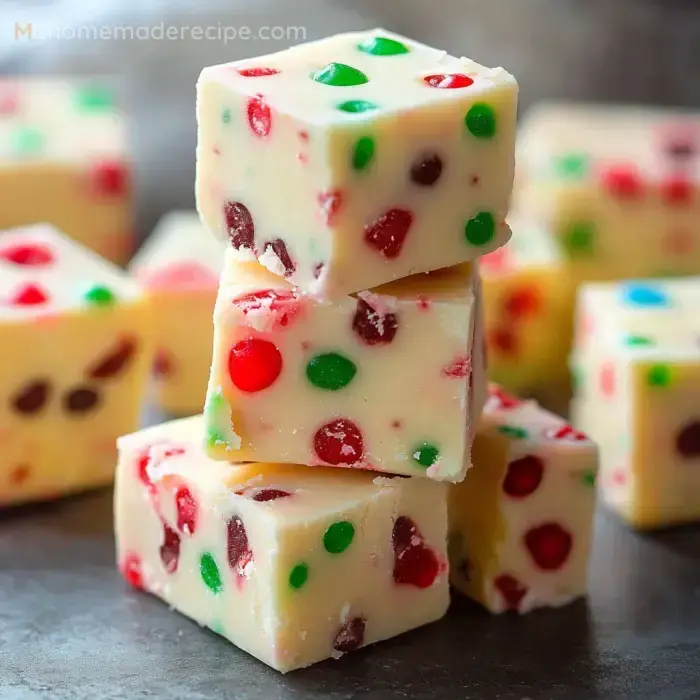
I just grabbed my white chocolate gumdrop fudge from the fridge, and wow, it's like having a colorful party right on my countertop! Whipped this up for the first time during last year's holidays when I wanted something different than the usual chocolate treats. The white base really makes all those bright gumdrops stand out – kinda like tiny jewels frozen in snow. My kid says it looks straight out of a candy wonderland, and I gotta say, she's spot on!
The Magic Behind It
Whipped up this fudge for our community sale yesterday – it vanished within 20 mins flat. Folks really dig how it stands out from typical fudge varieties, and the little ones go bonkers for those soft, chewy candy bits. It only needs about 15 mins to put together, then just let your fridge do the rest. Last Christmas I handed these out as presents – tucked pieces into small containers with decorative strings. That creamy white chocolate background really showcases every colorful gumdrop perfectly.Your Ingredients
- White chocolate: Splurge on quality chips from the baking section – cheaper ones turn out lumpy
- Sweetened condensed milk: A single tin is plenty – watch out not to grab evaporated milk instead
- Vanilla: A tiny bit enhances the chocolate flavor
- Gumdrops: Choose red/green for holiday theme, or any rainbow mix for regular occasions
Prep Steps
- Prepare your container
- Cover a square dish with aluminum foil – helps you remove it cleanly afterward
- Combine and warm
- Stir chocolate and milk together on gentle heat – constant mixing prevents burning
- Add flavor boost
- Pour in vanilla after chocolate melts – creates an incredible aroma
- Fold in candy
- Toss in your cut gumdrops while mixture's still hot
- Transfer mixture
- Empty everything into your dish and flatten with the back of your spoon
- Let it set
- Place in refrigerator until completely firm – generally needs a few hours
Its Unique Charm
The candy pieces nestle into the warm mixture but keep their bright colors visible on the surface. Made a fresh batch yesterday – sliced into it this morning and every piece looks like a tiny treasure chest. Little ones enjoy hunting for their favorite colors, and the gumdrops give a chewy texture that's way more exciting than standard fudge.Avoiding Mistakes
Found out the tough way to keep the temperature down – ruined my initial attempt and my whole house smelled burnt for ages. Making sure your container is properly lined will save you loads of trouble down the road. Created three batches for a get-together last week – the secret is getting all components measured and ready before you start the melting process.Gumdrop Tips
Slice the candies when they're chilled – much less messy that way. I now keep a pair of scissors specifically for candy work after ruining one with sticky melted sweets. Christmas colors look festive, but any combination works great. Created a multicolored version for my little niece's party – it was the star of the dessert spread.Storage Advice
They'll stay tasty in your fridge for roughly a week. Made too large a batch previously and discovered they freeze quite nicely. Just place parchment between the rows so they won't stick together. They taste much better when not cold though, so take them out half an hour before you plan to eat them.Display Options
Make these pieces tinier than normal fudge – they pack a sweet punch. Created small present packages with colored paper for my kids' teachers last season. They add a nice touch to a holiday snack platter alongside other goodies. Sometimes I toss extra chopped candy bits on top just as the fudge begins to harden for more visual pop.Frequently Asked Questions
- → Can I substitute with other chocolate?
Sure, dark or milk chocolate can be used, though they’ll give it a different taste and look.
- → How should this be stored?
Keep it in the fridge inside a container. It stays fresh for about 7 days.
- → Can homemade gumdrops be used?
Yes, they work great and give you a chance to pick custom flavors.
- → What if I don’t have a square pan?
Any type of pan works. Just cut pieces to the sizes you prefer.
- → Can I skip sweetened condensed milk?
No, the texture depends on it, so it’s a must-have ingredient.
Conclusion
If you enjoy this, check out Raspberry Bark or Candy Cane Truffles. Both use white chocolate and come together quickly. The bark adds a fruity touch, while the truffles bring peppermint crunch. Great for sharing during holidays!